
How to position your right hand and arm on classical guitar. This lesson includes a video tutorial, technique reference photos, and diagrams for right hand position and technique on classical guitar. This is specifically for students of the classical guitar with an aim to provide some basic guidelines to help you achieve a healthy and efficient right hand position and technique. Beginners should use this as the foundation of their technique and intermediates should review these tips for bad habits.
Very Important: See my lesson on Classical Guitar Position (How to Sit and Hold the Guitar). That is the starting point for everything. It is essential you that you have a good sitting position or none of the below tips will help.
Here a summary of the 10 essential principles for right hand position and technique that we will discuss and learn. The times are for the video above. Here’s the YouTube Link if you want to watch it there.
- 1:50 Posture & Guitar Position – You must have a good posture and guitar position to position the right hand correctly.
- 3:07 Arm Position – The main contact point is the mid forearm.
- 5:20 Hand Location on Guitar – Beginners should aim to play near the rosette.
- 6:47 Wrist Orientation – Straight forearm-to-wrist alignment and a relaxed arch to the wrist.
- 9:17 Finger Curvature – Each finger joint or segment should be curved rather than straight or clenched.
- 10:56 Finger Movement – The fingers move in toward the palm.
- 14:06 Thumb Position and Movement – The thumb is in front of the fingers.
- 16:55 Reflexive Returns – Aim to reflex the fingers back to the starting position and not retain tension after the finger plucks the string.
- 19:58 Stability – With good arm contact the hand should comfortably be able to float and be stable through all techniques.
- 24:55 One Hand Position for All Techniques – Our perfect hand position should be able to remain still and intact during all traditional techniques.
- 27:57 Side Note on Hand Movement
- 31:19 Review
- 33:40 Conclusion
10 Principles for Right Hand Position and Technique
Principle 1 – Posture and Guitar Position
You must have a proper posture and guitar position in order to have a correct right hand position. See my full lesson on Classical Guitar Position (How to Sit and Hold the Guitar). It is essential that you have a good sitting position or you will not be able to position your hand and arm properly.
Below are some videos, photos, and diagrams but be sure to see the full lesson.
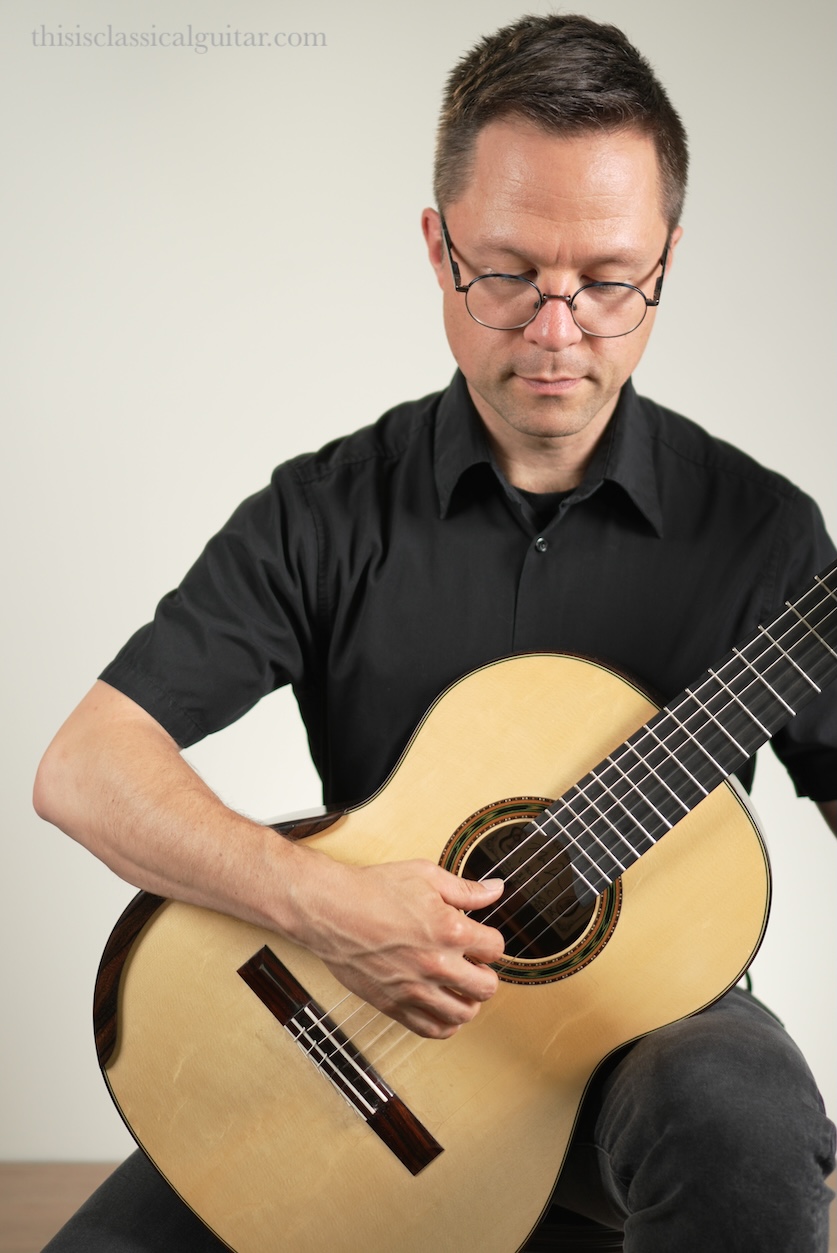
The below diagram demonstrates an aligned spine, relaxed balanced shoulders, and the ergonomic right hand placement without bends in the wrist.
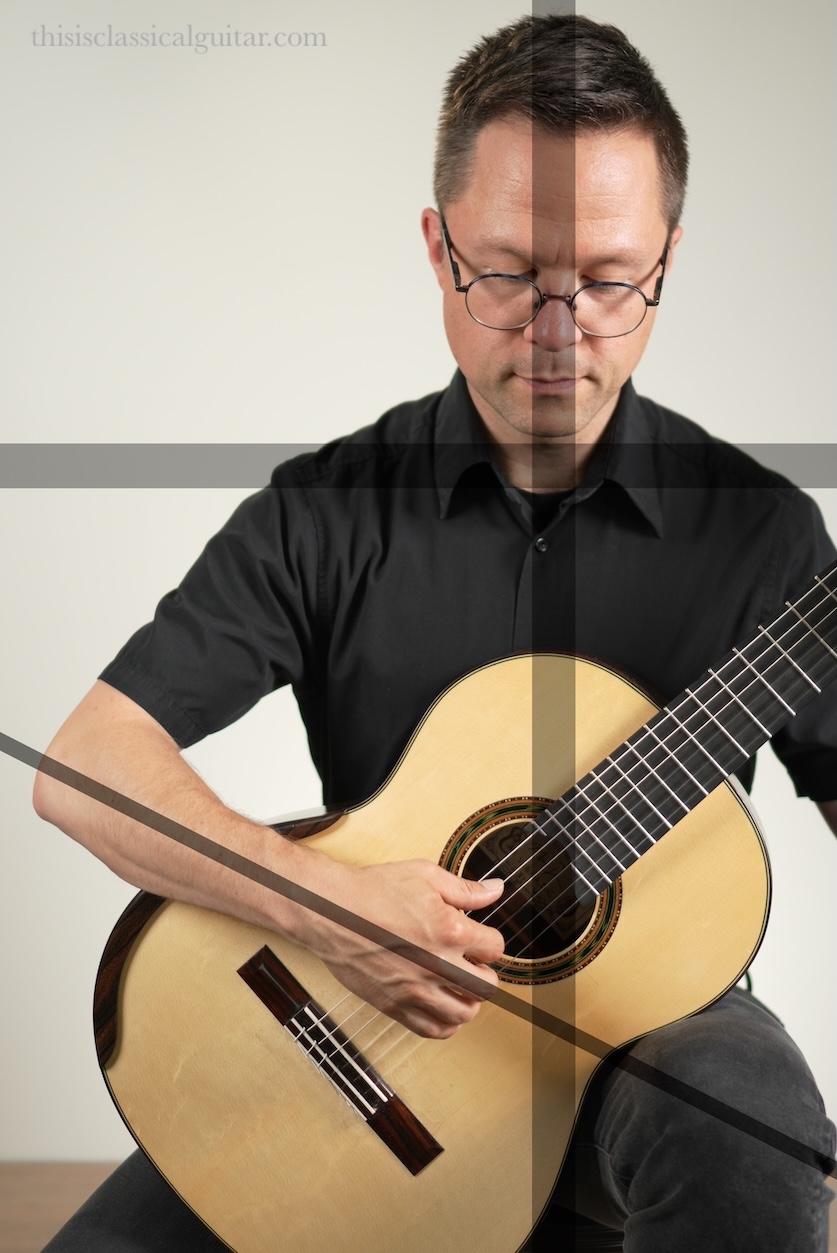
Principle 2 – Right Arm Position
The main stability contact point is on the mid-forearm below the elbow and above the wrist. For most people this is 1/3 the way down from the elbow. Check your shoulder relaxation and drop your arm into place using only gravity to rest it on the guitar.
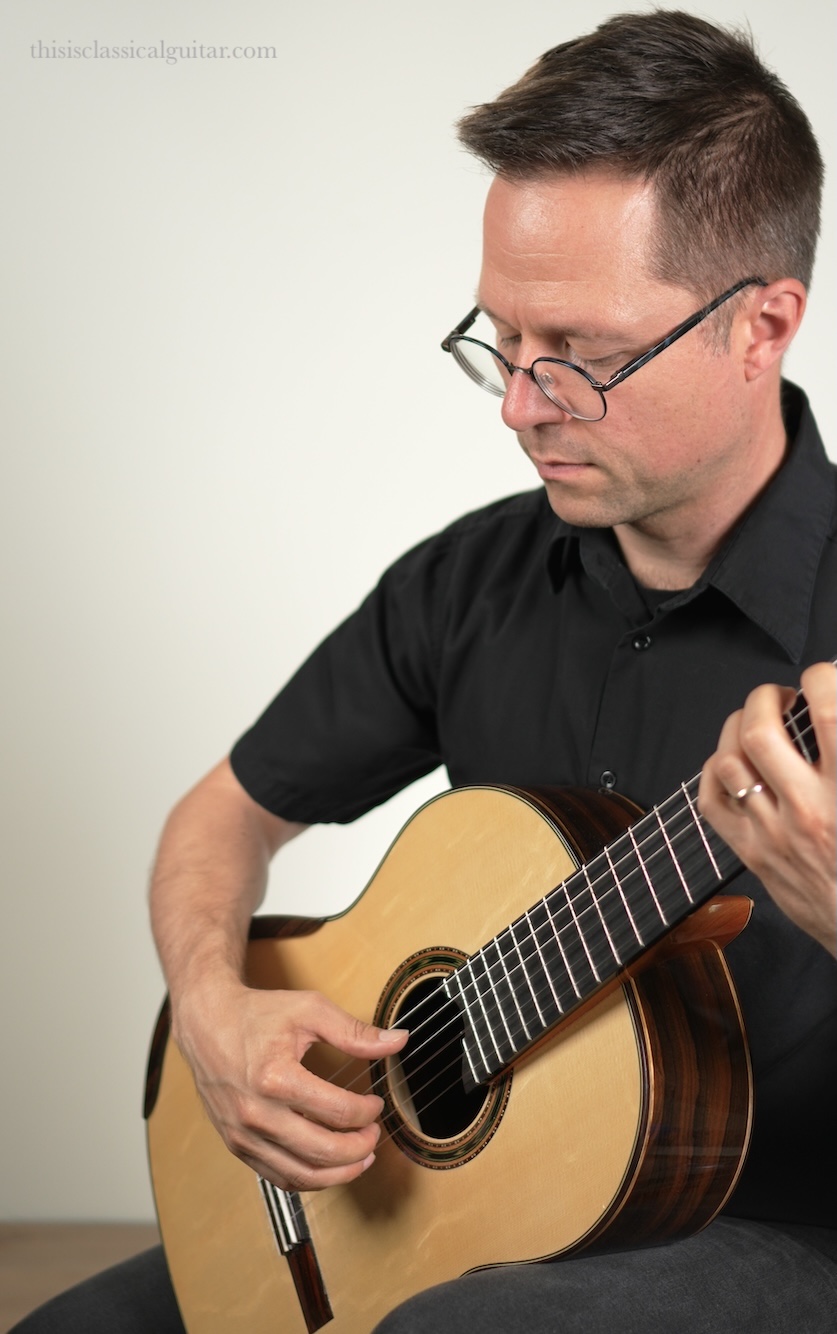
Principle 3 – Hand Location on Guitar
Beginners should start with a hand location near the rosette of the guitar (the decorative circle around the sound hole). There are three basic locations for playing:
- Centre: Playing near the rosette creates a balanced sound with warmth and clarity.
- Ponticello: Playing near the bridge creates a bright sound that can be clear but sometimes brittle.
- Tasto: Playing near the fingerboard creates a warm round sound but can lack clarity and separation.
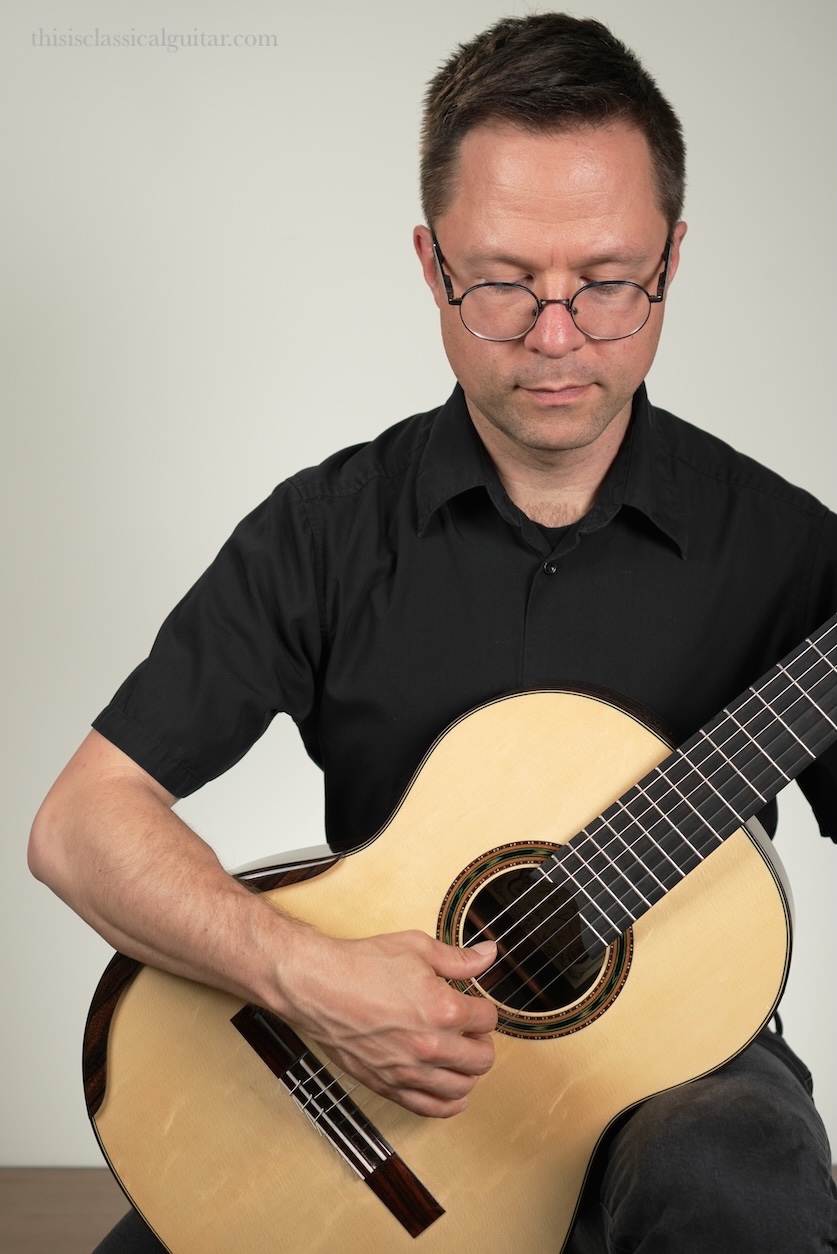
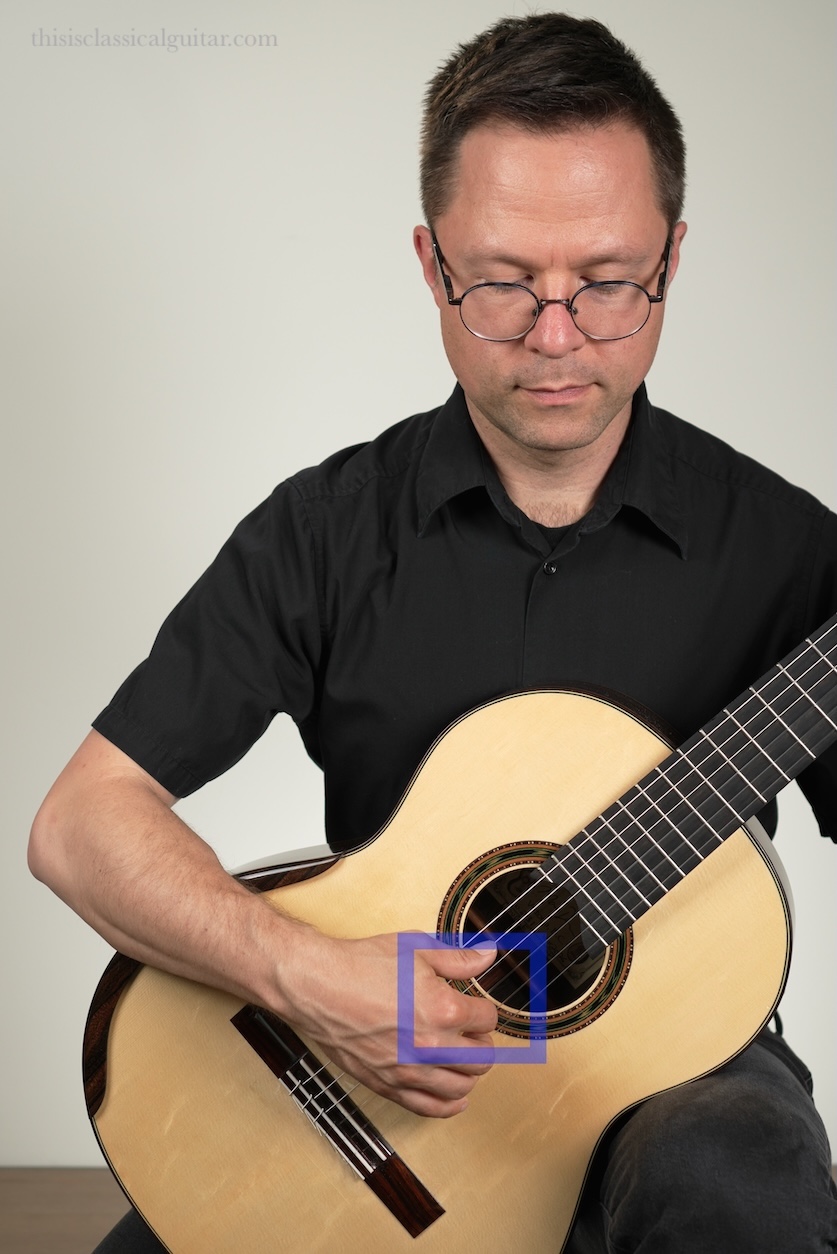
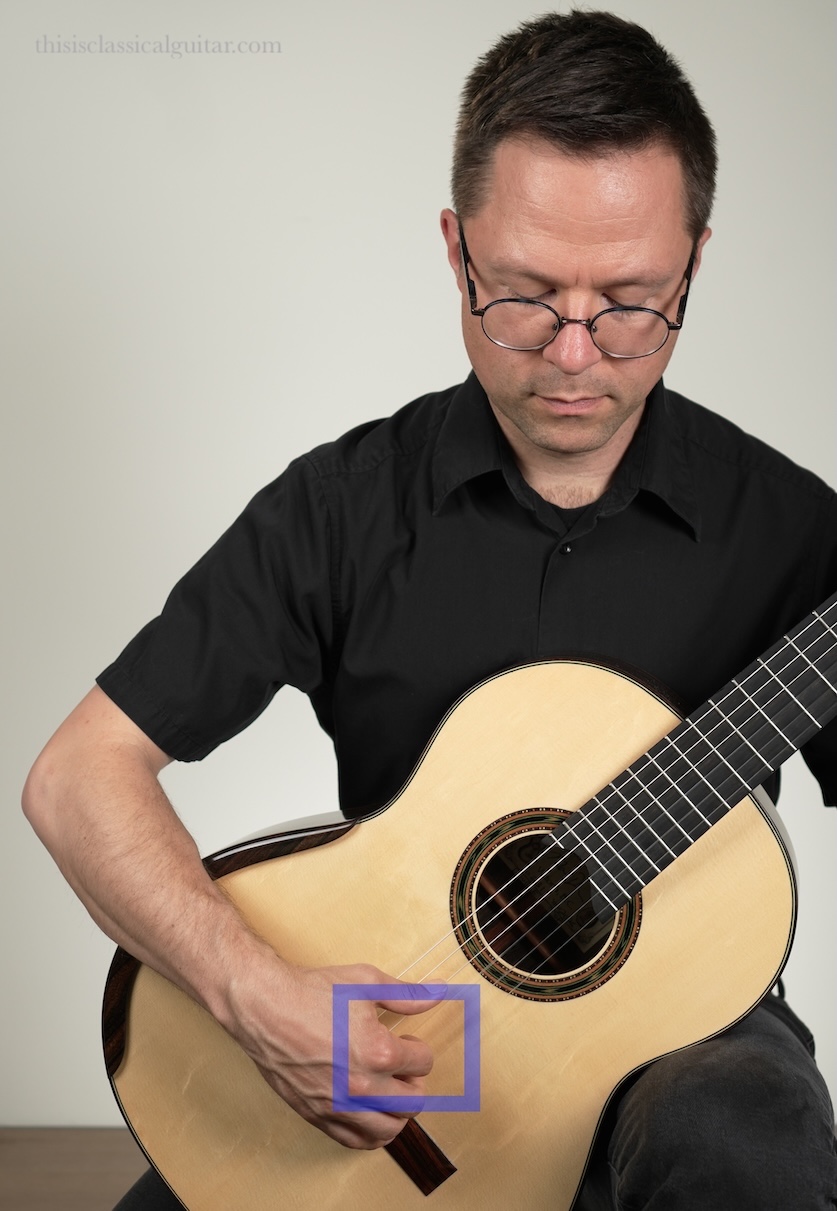
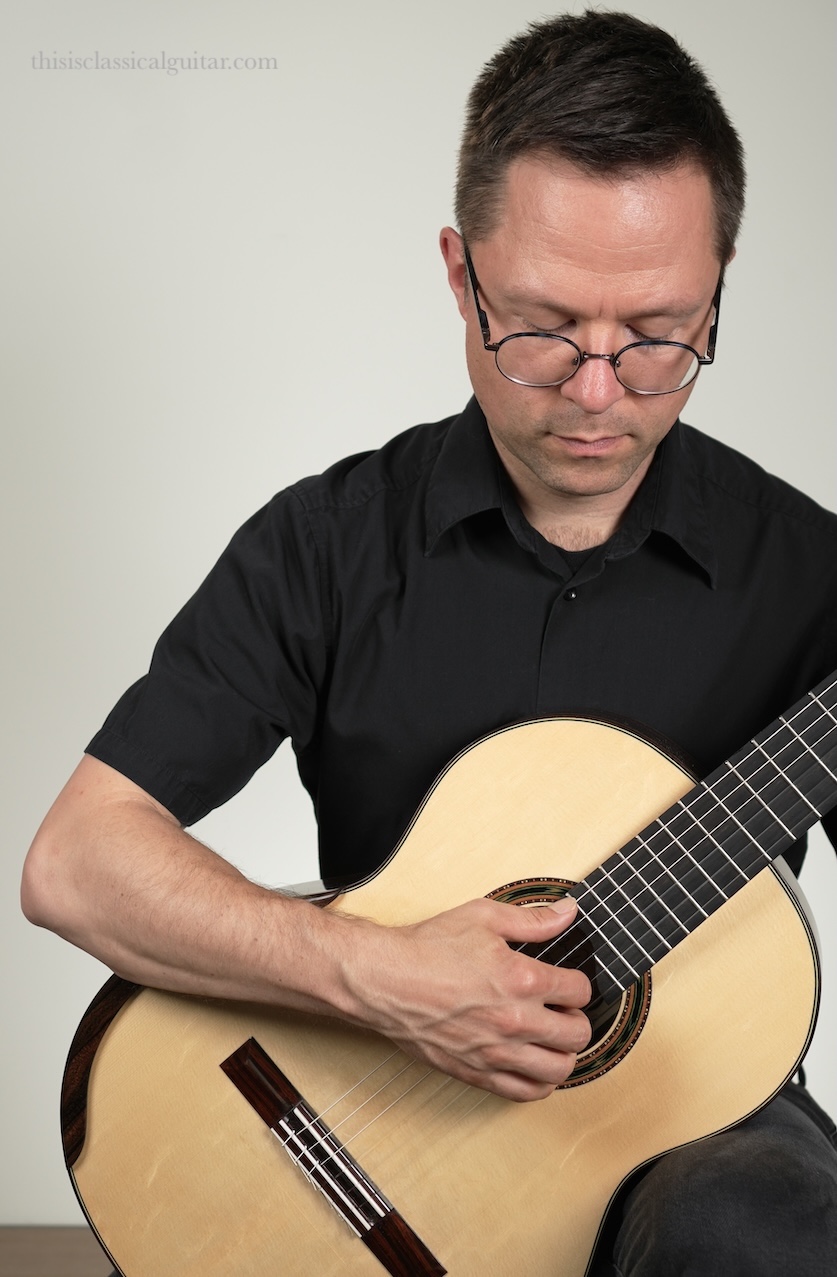
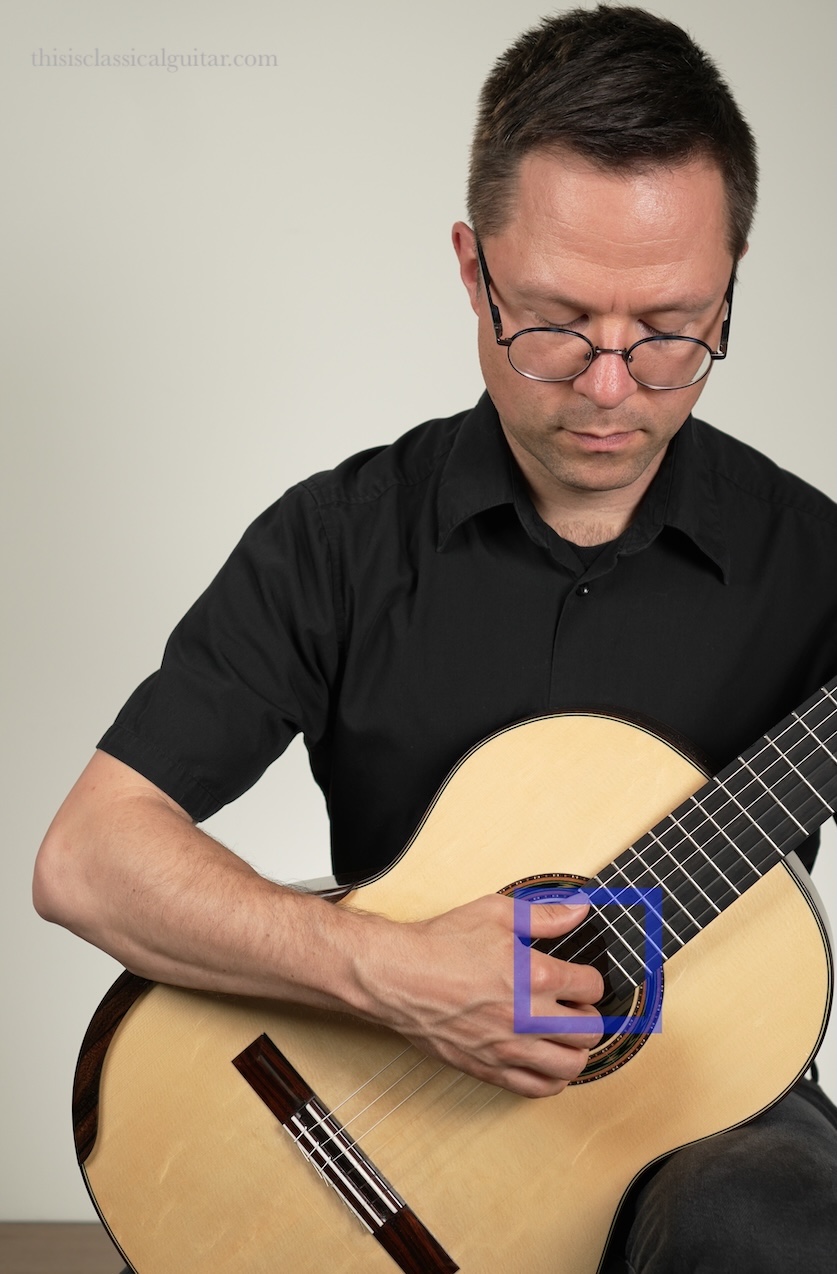
Principle 4 – Wrist Orientation
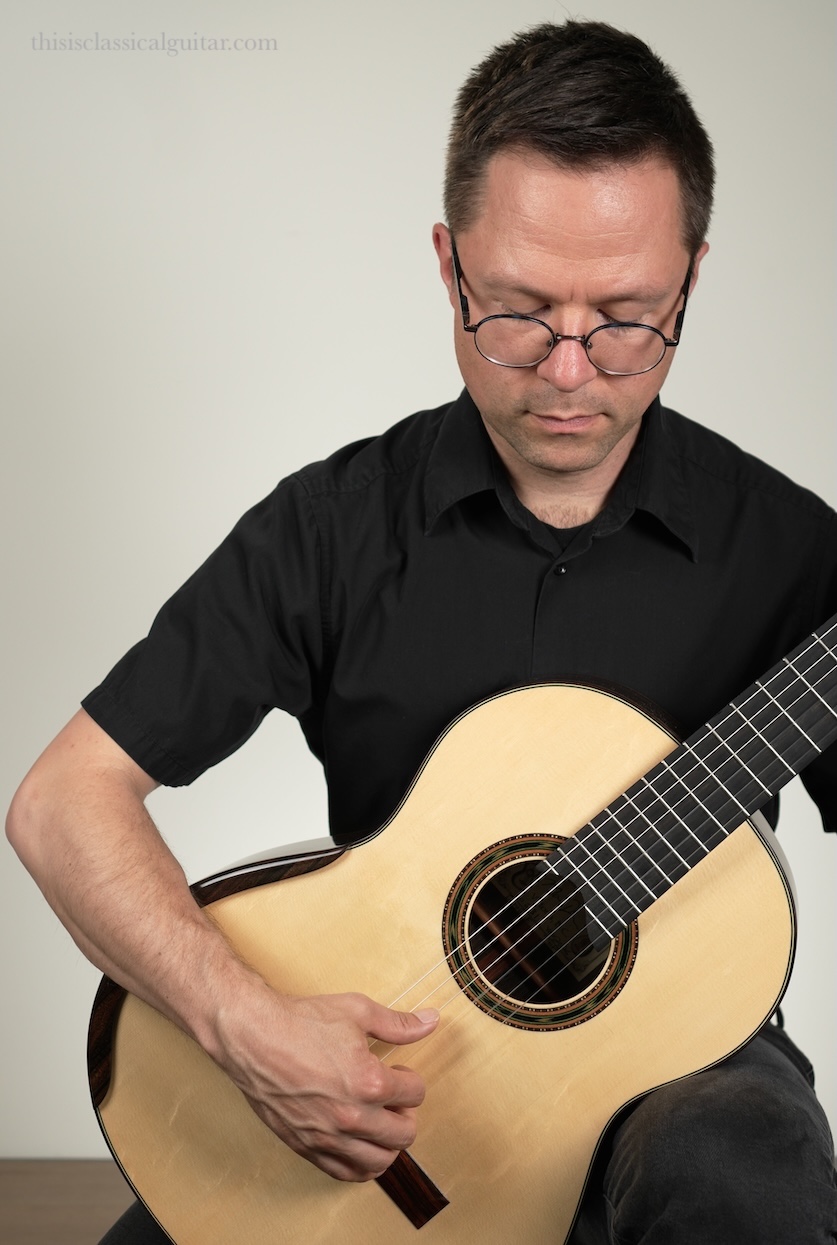
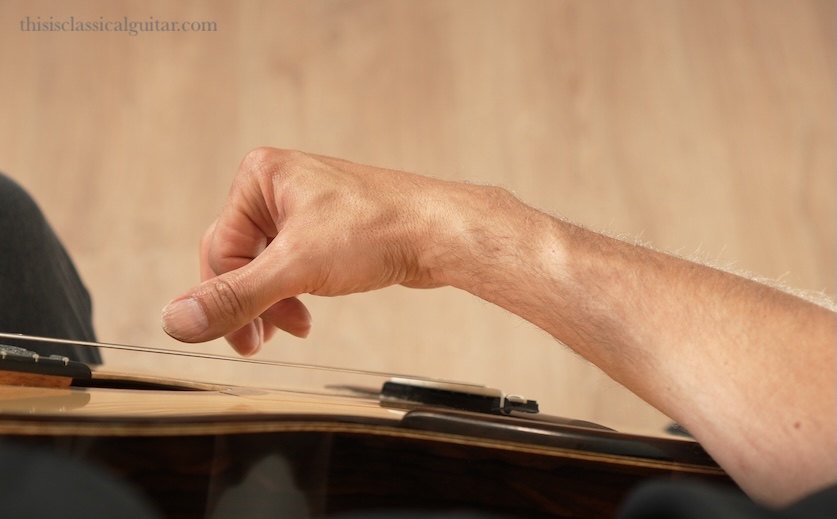
The forearm to the wrist is generally straight with a relaxed and natural arch in the wrist. You want a straight ergonomic forearm-wrist without bending to one side or the other. Aim for a relaxed and natural arch in the wrist itself.
You can see in this photo that the right wrist has a natural and relaxed arch. This is very important. Don’t force the arch or over-do-it just let it naturally arch. See the video for the good and bad comparisons.
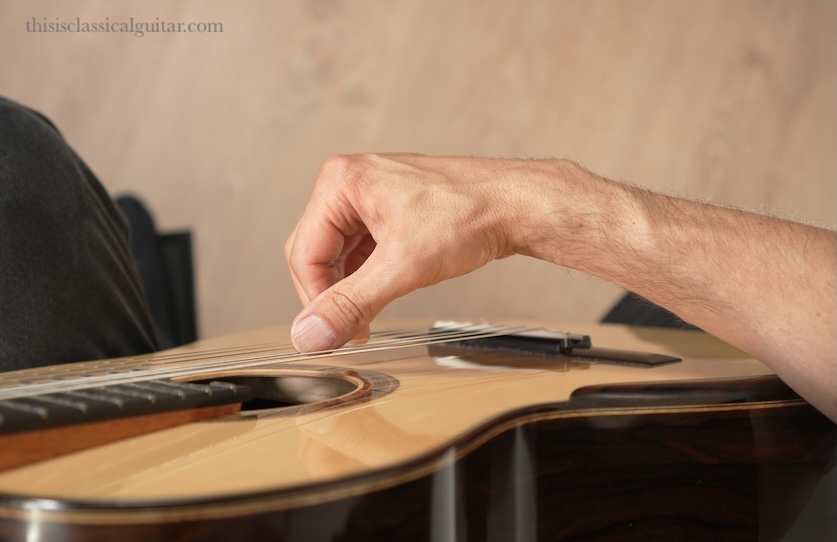
Principle 5 – Finger Curvature
The fingers should have a relaxed curvature and be curved at each joint. Imagine you are holding a tennis ball, none of your fingers would be outstretched or tightly clenched.
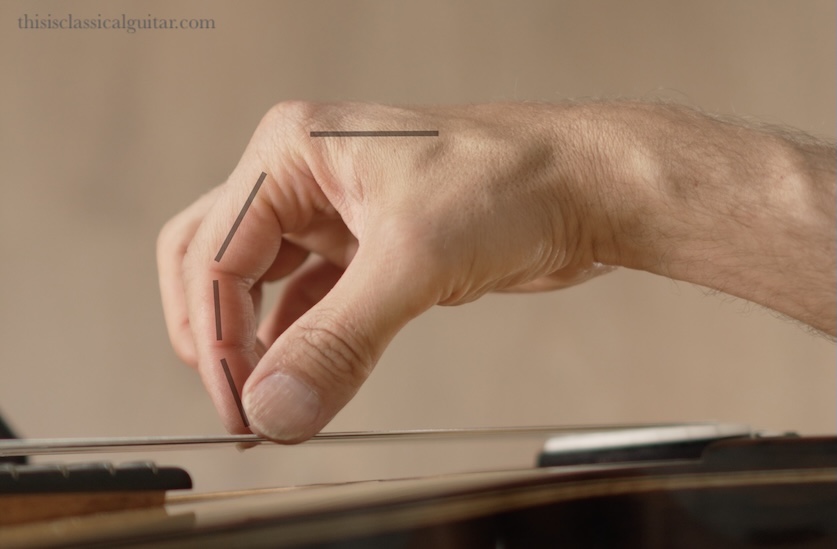
Principle 6 – Finger Movement
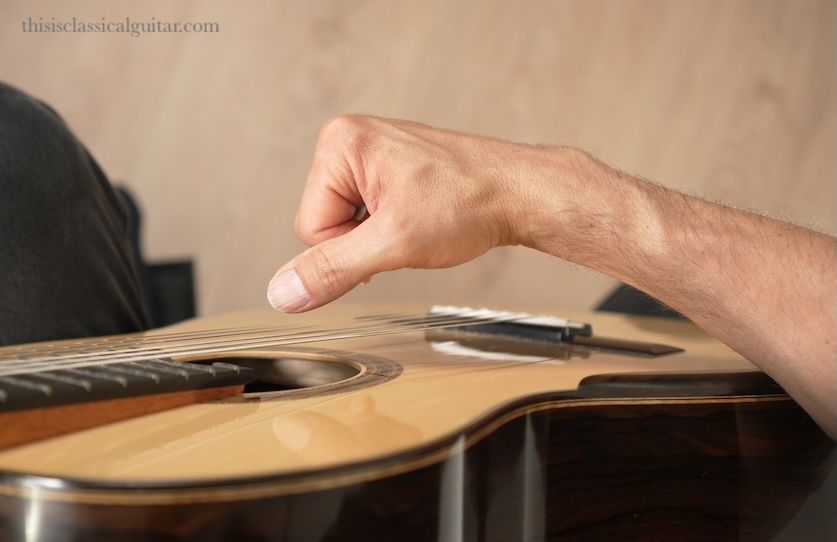
The fingers move into the palm mainly using the upper knuckle joint. The thumb is on the outside as your fingers move into the palm. Touch your palm as a helpful way to remember the movement (just as an experiment, we would not touch our palm when playing).
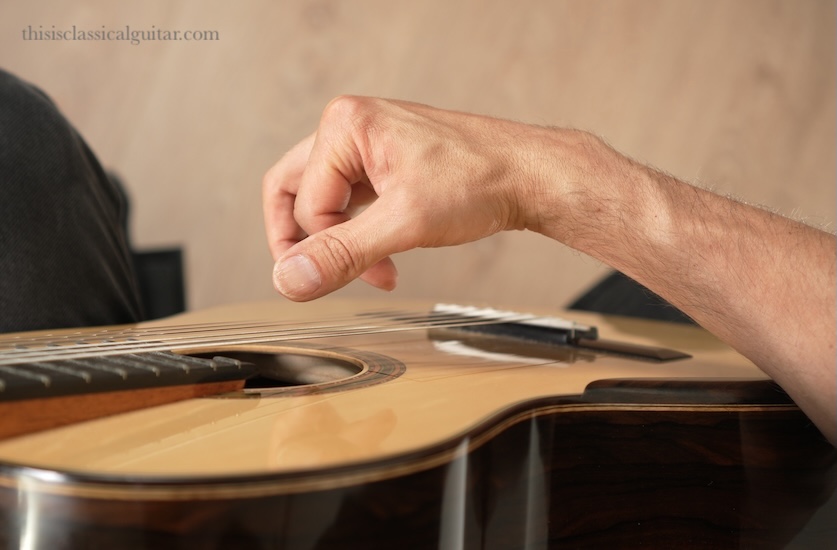
Principle 7 – Thumb Position and Movement
The thumb is positioned in front of the fingers. It is important to experiment with your guitar angle as this will set the thumb either in front or behind the fingers (see video). You want to avoid the fingers and thumb competing for the same space. In other words, we want to avoid traffic jams. You can try playing an alternating thumb and index finger on same string as an exercise to make sure your thumb is in front.
Principle 8 – Reflexive Returns
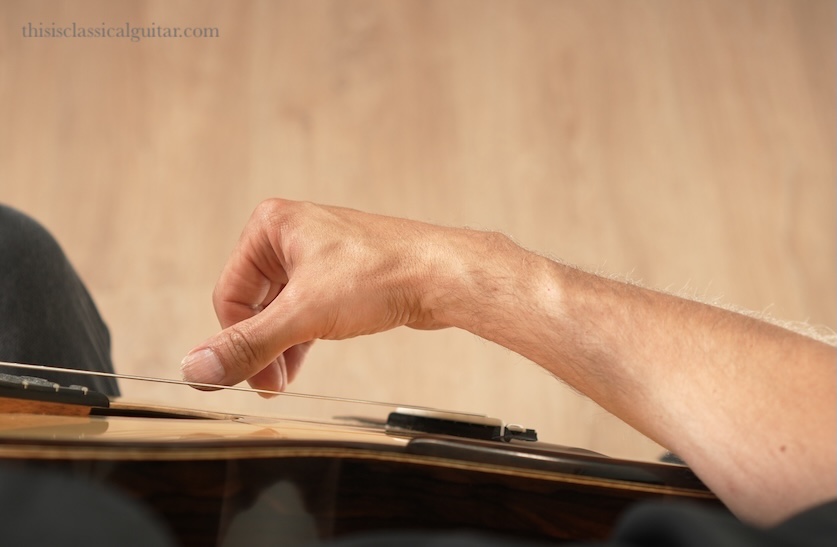
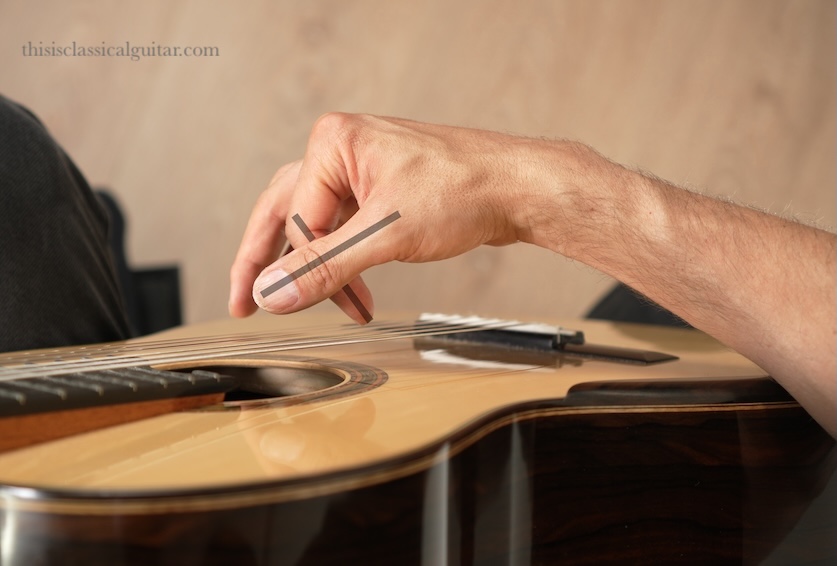
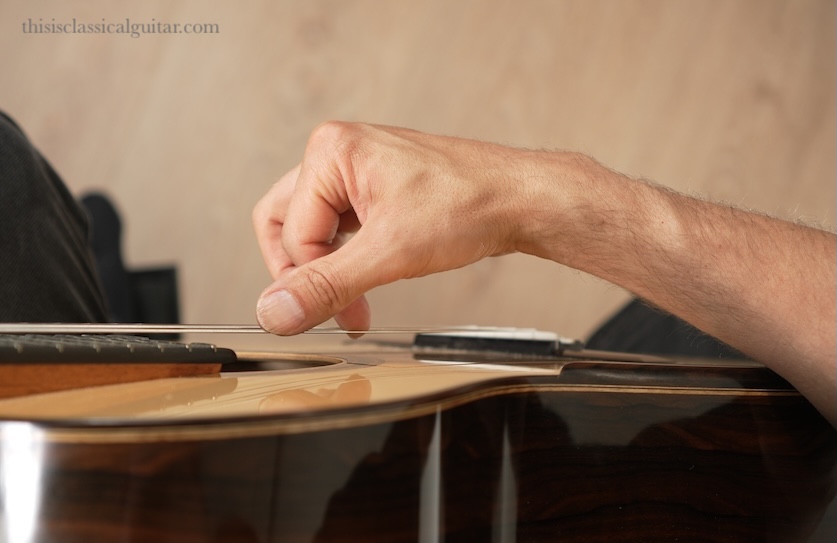
Move the fingers in toward the palm and then release to the starting position. This is best demonstrated in the video but the idea is that we do not want to hold tension in the fingers or thumb after plucking the string. Through relaxation and release, our finger should reflex back to the starting position.
Principle 9 – Stability
The main stability contact point is on the mid-forearm with gravity holding your arm on the guitar which allows the hand to hover over the strings effortlessly. This helps with accuracy and relaxation. It also allows the hand to be in a static position when playing arpeggios and complex textures.
A very common issue for student is hand bounce. With a stable arm, good wrist position, and good finger curvature, you should be able to play without the hand itself moving much or bouncing away from the strings. The most common reason for hand bounce is incorrect finger movement in toward the palm and/or hand distance from the strings and finger curvature (see video).
10th Principle – One Hand Position for all techniques
The goal is to have one hand position for the majority of traditional techniques because as you advance you can’t be moving your hand into different positions all the time or in close proximity to a variety of techniques. Try keeping your hand hand still and in only one position while mixing rest strokes and free strokes or melodic passages and arpeggios.
Q&A for This Lesson
Does finger activation only occur from the upper (knuckle) joint? Sometimes I notice varying degrees of movement from other parts of the finger when watching pros play specific techniques.
Activation can happen from the other joints or parts of the finger as well. But upper joint activation with movement in-toward the palm often helps students avoid a hand position height that doesn’t allow for full movement and/or the yanking out of the strings which is so commonly an issue for students. It is a way to encourage beginners in particular to understand the hand position and clearance issues right from the beginning while leaving the subtle points of other activation for a more in-depth discussions. The type of sound and stroke you are after can have varying degrees of activation from other parts of the fingers but my advice remains the same as a generalized statement about finger movement.
Books and Exercises for this Lesson
Beginners should start with my free Classical Guitar Method Volume 1 with complete video lessons. It’s a free 100 page pdf or hardcopy book.
Intermediates should try the 100 open string exercises from my Classical Guitar Technique which as 122 pages with tons of video lessons.
More Resources
Find more articles at the Lesson Archive Page.
Join me and my students via the Free Membership Newsletter. The newsletter enables my students to access the highest quality pro videos, lessons, and sheet music. They can absorb the culture, learn by watching, and enjoy a weekly dose of quality classical guitar. Join us and get inspired.
If you like these lessons you can consider supporting the site.
Related Lessons:



What a great refresher for me. Thank you! I can’t believe the wealth of info you provide at no charge. I just purchased on Amazon a number of your materials both to learn more and to say thank you.
Thanks so much Rick, I really appreciate that. I have plans to continue to upgrade my older lessons and create a more clutter-free index as well. Enjoy!
Hi Bradford, when playing with ‘m’ and ‘a’ fingers, my ‘i’ finger flexes and so doesn’t match the curvature of the other fingers. This also moves the ‘i’ finger further from the strings. I have tried taping my ‘i’ finger to my ‘m’ finger but when removed the ‘i’ finger reverts back to flexing. If I play excruciatingly slow I can gain some control over it by watching it as I play. Just wondering if you have any tips to maintain the correct position of the ‘i’ finger when not actively playing strings. Thanks David
This is not uncommon and is usually, at least in part, caused by tension in the hand overall. Please do not tape your fingers down or use any contraptions. This can lead to injury and more tension. I think at the moment you just want to focus on a wide variety of technique exercises and relaxation and not worry about it too much. Most of the time, with increased dexterity and finger independence along with more relaxation and a more reflex-oriented technique, these issues can clear up naturally. Send me an email if you like with more information about your level and I can give more specific advice.
I played a classical guitar a decade ago, before my marriage. Back then, I thought I was pretty good. But actually, I had so many bad habits that kept me from becoming a really good player. I am trying now to learn the proper way this time and your diagrams have been so insightful and inspiring to me in trying to correct my technique. I am guilty of just about every single error. Crab-clamping the neck to make barre chords, wrists bent at awkward angles, etc. After just some time reading your lessons and looking at the diagrams, I was able to barre without all of the struggle and wrist pain I used to go through, especially the first and second frets. Thank you so much for these valuable resources. I really can’t wait to learn again.
I am working on your grade three book. Have gone through all your books. Can’t play all the pieces perfectly but am trying. Really enjoying it you are amazing. Have taken three years of local classics lessons. But I have trouble with rolling my chords. It’s sounds so beautiful when that is done instead of block chords. I have adjust my guitar have adjust my right hand position to correct the straight wrist position. But still can’t successfully roll my chords. Sometimes yes but most time not. It’s just a quick m i a arpeggio right? Or do you sometimes do a m i? Whichever way sounds good to me. But I guess it takes lots of practice it get it right.
It’s more of a gesture rather than something you can force your fingers to do. Almost a relaxed pulling away but on a micro level yes it is just an arpeggio. Just work on finger independence and relaxation and it will come in time.
What is the proper angle for the finger nail at the point of striking the string? Should it be roughly parallel to the string, or should it be at more of an oblique angle? Thank you very much. I appreciate your site.
Have you seen my dedicated fingernail lesson? https://www.thisisclassicalguitar.com/fingernails-on-classical-guitar/
That was very helpful. Thank you. I am currently working with your classical guitar technique book. Much appreciated.
Is alternation a “must”?..how important is it, and why?
Watch this video for my answer (but, YES, is the answer): https://www.thisisclassicalguitar.com/alternating-right-hand-fingers-classical-guitar/
I see the right hand exercises in the back. I’ll pay closer attention to them. Thanks 🙂
How do we know what fingers to use when we play a piece that both has chords and melody? I see some fingerings in the textbook and I’m confused as to how you chose them. What is the logic? I feel lost in my right hand technique. I can play the notes left hand but each time I play right hand it feels different.
Good question. My first answer is to study technique exercises a good deal. The ones at the back of my free book are a good start. Technique exercises not only train your fingers in good habits but also inform them as to which fingerings are efficient. The rest depends on the context of the piece you are playing. You said something about a “text book” but which one are you using? Are you talking about my method book vol. 1? If so, I discuss most fingerings in the videos for each piece.
I’m using #2. For me It’s mostly a question of when to use the a finger instead of m for example.
Hi,
is it safe to assume that your books: “Classical Guitar Method Vol. 1” and “20 Favorite Exercises”, along with the videos, is a great place to start out on classical guitar? I know a dozen chords or so, but I can’t play a whole tune, so I am basically total newbie. 🙂
Thanks in advance!
Yes, that would be a great start. The method will get you reading music and the technique/exercise book will boost your physical skills.
your lessons are seriously changing my life. I’ve been playing guitar, mostly untrained for 15 years!
Is it ok to rest your pinky on the face of the guitar?
Steel-string players often rest their pinky and historically some early music players might as well. However, in general, classical guitarist do not rest their pinky as they are aiming for maximum relaxation and dexterity int he hand. Support for the hand comes from the forearm contact point on the guitar and the weight of the arm by way of gravity.
This is marvellous. Thank you so much.
Have her constantly demonstrate to you and her teacher the correct AND incorrect hand position so she clearly understands what to do and not do. Constantly have her correct her hand after every singe phrase in the music. If it has to be said 100 times do it. You can make a funny joke or saying to keep it fun. If they are young, I call the flat wrist and hand “the crab” and every time I see I simply say the word CRAB!
Hello Bradford,
thank you for your very informative and useful site. My question is about how to correct this right hand bad habit in a young learner.
My 13 year old daughter has been learning guitar for a year now, taking a weekly lesson with a classical guitar teacher, and practicing. She has made decent progress.
However, her right hand position seems terrible to me (I am a very amateurish amateur). There is hardly any distance between her wrist and the strings, so the thumb is completely parallel to the string it plays, and the base of the thumb is almost touching the string. This results in a thumb movement that has to go outwards from the string, making a very long trip before it returns. I don’t even understand how she can manage to play that way. I keep telling her to arch the hand by separating the wrist from the strings so the thumb meets the string at an angle, not parallel to it etc. She does it for two seconds and immediately goes back to her old ways. I am afraid this may become a habit impossible to correct.
If you have any suggestions as to how to go about correcting this, I’d appreciate it.
thank you.
Hi, your daughter is clearly very wise as she is correct, the thumb and indeed the fingers should contact the string at their central tips, with fingers straight, this is correct, playing with the thumb taking a crazy side swipe as most players do is ridiculous as there is no way that the thumb nail can contact the string like this unless it could be persuaded to balloon out to the left and this is of course impossible. The side swipe technique will cause circulation trouble (pins and needles) and painful injury while the parallel position it sounds like your daughter has allows for a superb apoyando that should be the primary means of expression.